https://www.brildor.com/en/rectangular-badge-magnets54342Rectangular Badge Magnets<p><a name="know-more"></a></p>
<h2>More information about the Rectangular Badge Magnets</h2>
<p> </p>
<p><strong>INDEX</strong></p>
<p>> <a href="#know-more1">Description</a></p>
<p>> <a href="#know-more2">Things to keep in mind</a></p>
<p>> <a href="#know-more3">Templates for customisation</a></p>
<p>> <a href="#know-more4">How to assemble rectangular magnets with a machine?</a></p>
<p>> <a href="#know-more5">Related posts</a></p>
<p> </p>
<p class="enlace"><a id="know-more1"></a> </p>
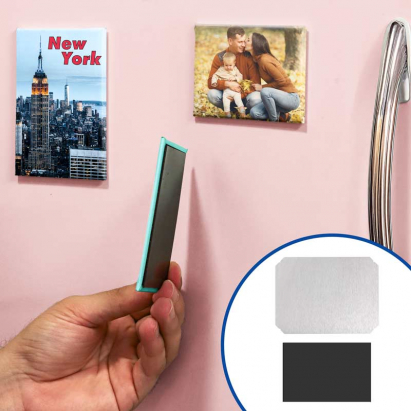
<p><strong>DESCRIPTION</strong></p>
<ul>
<li>To assemble the rectangular magnet, the following components are required:
<ul>
<li>Front metal plate for rigidity and design placement</li>
<li>Transparent protective sheet</li>
<li>Cardboard backing, also includes holes for pins</li>
<li>Magnetic sheet with adhesive</li>
</ul>
</li>
<li>You can purchase additional magnetic sheets in <strong>Related Products</strong></li>
</ul>
<p> </p>
<p class="enlace"><a id="know-more2"></a> </p>
<p><strong>THINGS TO KEEP IN MIND</strong></p>
<ul>
<li>The two magnet sizes are compatible with the <a href="https://www.brildor.com/en/magnet-assembly-machines-rectangular-button-badges" target="_blank" rel="noopener">machine for assembling rectangular badge magnets</a><span style="text-decoration: underline;">.</span></li>
</ul>
<p> </p>
<p class="enlace"><a id="know-more3"></a> </p>
<p><strong>TEMPLATES FOR CUSTOMISATION</strong></p>
<p>To view the template's layers, open the PDF file using Photoshop. Remember to activate them.</p>
<p><a href="https://tinyurl.com/ywd2yxze" target="_blank" rel="noopener">Rectangular Badge Magnets (.pdf - 0.77 MB)</a></p>
<p> </p>
<p class="enlace"><a id="know-more4"></a> </p>
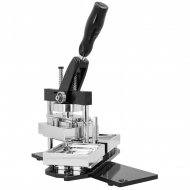
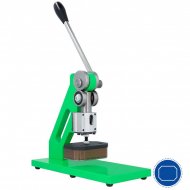
<p><strong>HOW TO ASSEMBLE RECTANGULAR MAGNETS WITH A MACHINE?</strong></p>
<p>A manual machine is required for assembly.</p>
<p><strong>Print the design</strong></p>
<ul>
<li>Use the <a href="https://tinyurl.com/ywd2yxze" target="_blank" rel="noopener">template</a> with cut and bleed guide</li>
<li>Ensure the design has a margin for folding</li>
</ul>
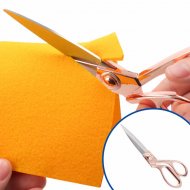
<p><strong>Cut the design</strong></p>
<ul>
<li>Cut along the outermost edge of the template</li>
<li>You can use scissors, a <a href="https://www.brildor.com/en/cutters-rectangular-badge-magnets" target="_blank" rel="noopener">die-cutter</a> or plotter depending on the volume and precision required</li>
</ul>
<p><strong>Assemble the magnet</strong></p>
<ul>
<li><strong>Part A of the mould</strong>:<br>
<ul>
<li>Place the aluminium plate</li>
<li>Position the cut design on top</li>
<li>Add the protective sheet</li>
<li>Rotate the base to align <strong>Part A</strong> with the top part</li>
<li>Press the lever and lift it back up</li>
</ul>
</li>
<li><strong>Part B of the mould</strong>:
<ul>
<li>Place the back of the magnet</li>
<li>Rotate the base to align it with the top part</li>
<li>Press the lever again</li>
<li>Attach the magnetic sheet</li>
<li>The magnet is now ready</li>
</ul>
</li>
</ul>
<p> </p>
<p class="enlace"><a id="know-more5"></a> </p>
<p><strong>RELATED POSTS</strong></p>
<p><a title="More than 10 ideas for selling personalised badges" href="https://www.brildor.com/blog/es/mas-de-diez-ideas-para-vender-chapas-personalizadas/" target="_blank" rel="nofollow noopener">More than 10 ideas for selling personalised badges</a></p>
<p><a title="Personalised badges: how to make them, ideas and tips" href="https://www.brildor.com/blog/es/como-chapas-personalizadas/" target="_blank" rel="nofollow noopener">Personalised badges: how to make them, ideas and tips</a></p>https://www.brildor.com/media/catalog/product/i/m/imanes-tipo-chapa-rectangulares-d1.jpg0.42instock00.42000https://www.brildor.com/media/catalog/product/i/m/imanes-tipo-chapa-rectangulares-d1.jpg22909232652771150439512615433454341/Badges/Badges/Customisable Badges2025-07-09T13:07:14+0000