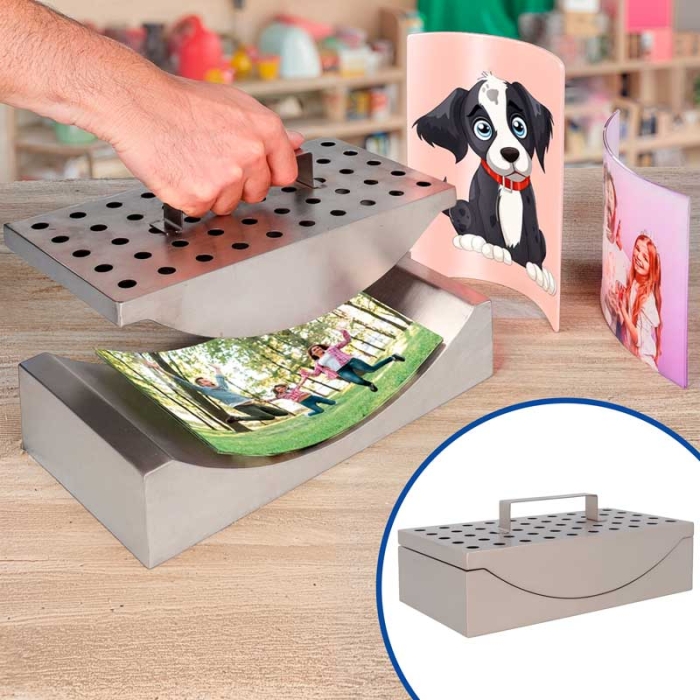
Heat-resistant moulds, allowing pressure to be applied without deformation
Lid with handle for easy manual pressure and structure with perforations to reduce weight
MAXIMUM MOULDABLE AREA
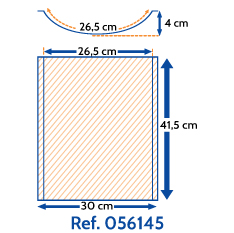
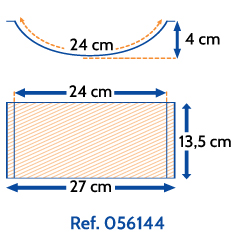
In the attached image, the rectangle represents the maximum usable surface of each mould
To choose the appropriate mould for your panel, measure it and ensure it is equal to or smaller than the maximum mouldable area
Allows for creating concave or convex shapes depending on the orientation of the acrylic
THINGS TO KEEP IN MIND
If customising the panel, first sublimate and then mould
Excessive heat could deform the panel
MEASUREMENTS
Reference
Shape
Maximum Mouldable Area (cm)
Base (cm)
Lid (cm)
Lid Weight (kg)
Lid + Base Weight (kg)
056144
Arch
24 x 13.5
25.5 x 13.5 x 5.5
25.5 x 13.5 x 5.5
0.58
1.22
056145
Arch
26.5 x 41.5
28.5 x 41.5 x 5.5
28.5 x 41.5 x 5.5
1.69
3.65
INSTRUCTIONS FOR USE
Heat the acrylic panel. If sublimating, place it freshly sublimated, while hot, onto the base
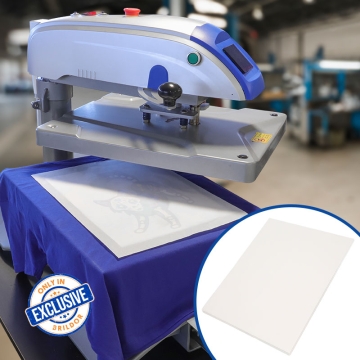
Place silicone-coated protective paper over the acrylic
Press the acrylic with the lid so that the panel conforms to the base of the mould
With the help of a protective glove, remove the panel and allow it to cool
Due to the different types of acrylic materials available in the market, we cannot specify a heating temperature. We recommend conducting preliminary tests.
https://www.brildor.com/en/metal-moulds-acrylic-panels54509Metal Moulds for Acrylic Panels<p><a name="know-more"></a></p>
<h2>More information about Metal Moulds for Acrylic Panels</h2>
<p> </p>
<p><strong>INDEX</strong></p>
<p>> <a href="#know-more1">Description</a></p>
<p>> <a href="#know-more4">Maximum Mouldable Area</a></p>
<p>> <a href="#know-more2">Things to Keep in Mind</a></p>
<p>> <a href="#know-more3">Measurements</a></p>
<p>> <a href="#know-more5">Instructions for Use</a></p>
<p> </p>
<p><a name="know-more1"></a></p>
<p><strong>DESCRIPTION</strong></p>
<ul>
<li>Heat-resistant moulds, allowing pressure to be applied without deformation</li>
<li>Lid with handle for easy manual pressure and structure with perforations to reduce weight</li>
</ul>
<p> </p>
<p><a name="know-more4"></a></p>
<p><strong>MAXIMUM MOULDABLE AREA</strong></p>
<ul>
<li>In the attached image, the rectangle represents the maximum usable surface of each mould</li>
<li>To choose the appropriate mould for your panel, measure it and ensure it is equal to or smaller than the maximum mouldable area</li>
<li>Allows for creating concave or convex shapes depending on the orientation of the acrylic</li>
</ul>
<table>
<tbody>
<tr>
<td style="text-align: center;"> <img src="{{media url="wysiwyg/Personalizables/esquema-molde-056144.jpg"}}" alt="Mould measurements for acrylic panels"></td>
<td style="text-align: center;"><img src="{{media url="wysiwyg/Personalizables/esquema-molde-056145.jpg"}}" alt="Mould measurements for acrylic panels"></td>
</tr>
</tbody>
</table>
<p> </p>
<p><a name="know-more2"></a></p>
<p><strong>THINGS TO KEEP IN MIND</strong></p>
<ul>
<li>If customising the panel, first sublimate and then mould</li>
<li>Excessive heat could deform the panel</li>
</ul>
<p> </p>
<p><a name="know-more3"></a></p>
<p><strong>MEASUREMENTS</strong></p>
<table>
<tbody>
<tr>
<td style="text-align: center;"><strong>Reference</strong></td>
<td style="text-align: center;"><strong>Shape</strong></td>
<td style="text-align: center;"><strong>Maximum Mouldable<br>Area (cm)<br></strong></td>
<td style="text-align: center;"><strong>Base (cm)<br></strong></td>
<td style="text-align: center;"><strong>Lid (cm)<br></strong></td>
<td style="text-align: center;"><strong>Lid Weight (kg)<br></strong></td>
<td style="text-align: center;"><strong>Lid + Base Weight (kg)<br></strong></td>
</tr>
<tr>
<td style="text-align: center;"><strong>056144</strong></td>
<td style="text-align: center;">Arch</td>
<td style="text-align: center;"><span class="azul-negrita">24 x 13.5</span></td>
<td style="text-align: center;"><span class="azul-negrita">25.5 x 13.5 x 5.5</span></td>
<td style="text-align: center;"><span class="azul-negrita">0.58</span></td>
<td style="text-align: center;"><span class="azul-negrita">1.22</span></td>
</tr>
<tr>
<td style="text-align: center;"><strong>056145</strong></td>
<td style="text-align: center;">Arch</td>
<td style="text-align: center;"><span class="azul-negrita">26.5 x 41.5</span></td>
<td style="text-align: center;"><span class="azul-negrita">28.5 x 41.5 x 5.5</span></td>
<td style="text-align: center;"><span class="azul-negrita">1.69</span></td>
<td style="text-align: center;"><span class="azul-negrita">3.65</span></td>
</tr>
</tbody>
</table>
<p> </p>
<p><a name="know-more5"></a></p>
<p><strong>INSTRUCTIONS FOR USE</strong></p>
<ul>
<li>Heat the acrylic panel. If sublimating, place it freshly sublimated, while hot, onto the base</li>
<li>Place silicone-coated protective paper over the acrylic</li>
<li>Press the acrylic with the lid so that the panel conforms to the base of the mould</li>
<li>With the help of a protective glove, remove the panel and allow it to cool</li>
</ul>
<p>Due to the different types of acrylic materials available in the market, we cannot specify a heating temperature. We recommend conducting preliminary tests.</p>https://www.brildor.com/media/catalog/product/m/o/moldes-paneles-acr_licos-d1.jpg125.95instock0125.95000https://www.brildor.com/media/catalog/product/m/o/moldes-paneles-acr_licos-d1.jpg42839435994955254387/Blanks/Blanks/Sublimation Panels/Blanks/Sublimation Photo Panels/Blanks/Tools & Accessories/Blanks/Sublimation Panels/Stands & Accessories/Blanks/Sublimation Photo Panels/Stands & Accessories2025-09-08T07:49:19+0000