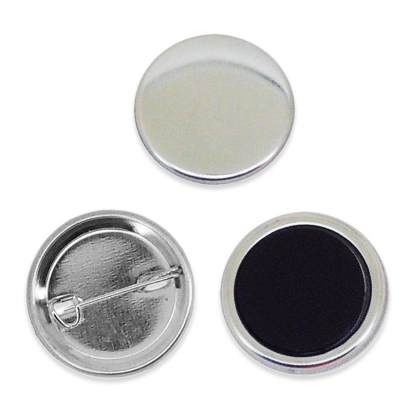
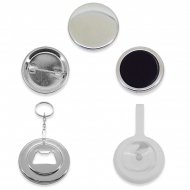
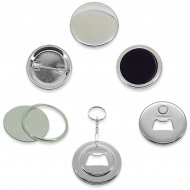
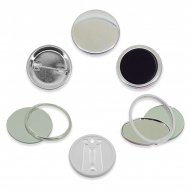
The badge includes a safety pin to attach it to clothing. Sale unit: 20 and 200-badge bags.
1 protective plastic film (Mylar).
1 metal plate to personalise (front).
1 metal plate with a pin (back).
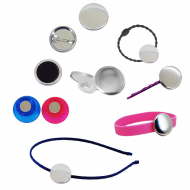
MAGNET - REF. 035416 & 032721
The badge includes a magnet that allows it to stick to any metal surface. Sale unit: 20 and 200-badge bags.
1 protective plastic film (Mylar).
1 metal plate to personalise (front).
1 circular and flexible black magnet circular negro y flexible, with an adhesive on its back.
1 metal plate on which the magnet has to be pasted (back).
How to personalise Ø32 mm button badges?
STEP 1: PRINT THE DESIGN
Design the motif that you want to place on the badge. Use images, photos, logos... and a lot of creativity.
Prepare a template according to the size and shape of the badge. Remember that the template must have an additional border, on the outside, to fold and attach the design to the back of the badge.
Print your design on paper, with your usual printer. It is recommended to use paper sheets with a 100-110 g/m2 thickness. You can personalise badges with other materials like fabric or vinyl but, for an easier explanation, we will suppose you will be using paper.
Download the template to help you print your button badges in eps, psd or pdf format.
STEP 2: TRIM THE DESIGN
Cut the printed paper on the outermost edge. You may use scissors or a utility knife (cutter). It is convenient to use a die cutting machine or a plotter to be able to cut several designs at the same time. It will help you gain precision and speed, achieving a straight, clean, and homogeneous cut. (see in Related Products).
STEP 3: ASSEMBLE THE BADGES
Prepare the badge making machine. For this example, we will suppose you are using a manual one. If you own a pneumatic machine, the steps are very similar.
Set up theØ32 mm round mould.
Place the front of the badge on the mould's Part A, with the sharp metal edge down.
On this plate, place the design that you previously trimmed, and cover it with the protective plastic film.
Rotate the base until the Upper Part aligns with Part A.
Hold the machine with one hand and push the lever down with the other one. Apply pressure and pull the lever up. The front plate will remain on the upper mould.
Place the back of the badge on Part B, with the sharp metal edge up. Try to align the plate with the positioning pin to ensure its correct orientation.
Rotate the base of the machine until the Upper Part aligns with Part B.
Hold the machine with one hand and push the lever down with the other one. Apply pressure and pull it back up.
Rotate the base of the machine again and remove the badge.
https://www.brildor.com/en/button-badges-d32mm25366Button Badges - Ø32mm<p><a name="know-more1"></a></p>
<h2>Components of each Ø32 mm button badge model</h2>
<p><strong>PIN - REF. 035411 & 028641<br /></strong></p>
<p>The badge includes a safety pin to attach it to clothing. Sale unit: 20 and 200-badge bags.</p>
<ul>
<li>1 protective plastic film (Mylar).</li>
<li>1 metal plate to personalise (front).</li>
<li>1 metal plate with a pin (back).</li>
</ul>
<p><strong>MAGNET <strong>- REF. 035416 & 032721</strong><br /></strong></p>
<p>The badge includes a magnet that allows it to stick to any metal surface. Sale unit: 20 and 200-badge bags.</p>
<ul>
<li>1 protective plastic film (Mylar).</li>
<li>1 metal plate to personalise (front).</li>
<li>1 circular and flexible black magnet circular negro y flexible, with an adhesive on its back.</li>
<li>1 metal plate on which the magnet has to be pasted (back).</li>
</ul>
<p></p>
<p><a name="know-more2"></a></p>
<h2>How to personalise <strong> </strong>Ø32 mm button badges?</h2>
<p><strong>STEP 1: PRINT THE DESIGN<br /></strong></p>
<ul>
<li>Design the motif that you want to place on the badge. Use images, photos, logos... and a lot of creativity.</li>
<li>Prepare a template according to the size and shape of the badge. Remember that the template must have an additional border, on the outside, to fold and attach the design to the back of the badge.</li>
<li>Print your design on paper, with your usual printer. It is recommended to use paper sheets with a 100-110 g/m<sup>2</sup> thickness. You can personalise badges with other materials like fabric or vinyl but, for an easier explanation, we will suppose you will be using paper.</li>
</ul>
<p><strong>Download the template</strong> to help you print your button badges in <a href="http://www.brildor.com/media/upload/downloads/Button_badge_template_brildor.eps" rel="no-follow" title="Button Badge Template (.eps)" target="_blank">eps</a>,<a href="http://www.brildor.com/media/upload/downloads/Button_badge_template_brildor.psd" rel="no-follow" title="Button Badge Template (.psd)" target="_blank"> psd</a> or <a href="http://www.brildor.com/media/upload/downloads/Button_badge_template_brildor.pdf" rel="no-follow" title="Button Badge Template (.pdf)" target="_blank">pdf format</a>.</p>
<p><strong>STEP 2: TRIM THE DESIGN<br /></strong></p>
<ul>
<li>Cut the printed paper on the outermost edge. You may use scissors or a <strong>utility knife</strong> (cutter). It is convenient to use a <strong>die cutting machine</strong> or a <strong>plotter</strong> to be able to cut several designs at the same time. It will help you gain precision and speed, achieving a straight, clean, and homogeneous cut. (see in <strong>Related Products</strong>).<span style="font-family: verdana, geneva;"><span style="background-color: #ffffff;"></span></span><span style="background-color: #888888;"></span></li>
</ul>
<p><strong>STEP 3: ASSEMBLE THE BADGES<br /></strong></p>
<ul>
<li>Prepare the <strong>badge making machine.</strong> For this example, we will suppose you are using a <strong>manual</strong> one. If you own a <strong>pneumatic</strong> machine, the steps are very similar.<strong> </strong></li>
<li>Set up the<strong> </strong><span class="azul-negrita">Ø32 mm </span><strong>round mould</strong>.</li>
<li>Place the front of the badge on the mould's <strong>Part A</strong>, with the sharp metal edge down.</li>
<li>On this plate, place the design that you previously trimmed, and cover it with the protective plastic film.</li>
<li>Rotate the base until the <strong>Upper Part</strong> aligns with <strong>Part A</strong>.</li>
<li>Hold the machine with one hand and push the lever down with the other one. Apply pressure and pull the lever up. The front plate will remain on the upper mould.</li>
<li>Place the back of the badge on <strong>Part B</strong>, with the sharp metal edge up. Try to align the plate with the positioning pin to ensure its correct orientation.</li>
<li>Rotate the base of the machine until the <strong>Upper Part</strong> aligns with <strong>Part B</strong>.</li>
<li>Hold the machine with one hand and push the lever down with the other one. Apply pressure and pull it back up.</li>
<li>Rotate the base of the machine again and remove the badge.</li>
</ul>
<p></p>https://www.brildor.com/media/catalog/product/c/h/chapas-redondas-d32mm-d7.jpg4.2instock04.2000https://www.brildor.com/media/catalog/product/c/h/chapas-redondas-d32mm-d7.jpg1573417374252902531425353253644490548759/Badges/Badges/Customisable Badges2021-07-24T06:11:01+0000