In Related Products, you will find Nomex felt pad and adhesive heat tape, which are very useful during the sublimation process
It is possible to sublimate them with flat press as well as with 3D oven and membrane vacuum oven
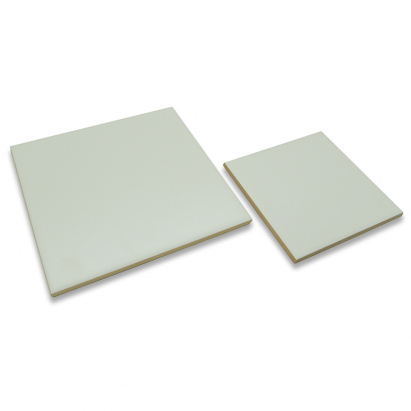
DIMENSIONS AND MAXIMUM PRINT AREA
Reference
Name
Dimensions (cm)
036899
10x10
10,6 x 10,6
036898
15x15
15,2 x 15,2
RECOMMENDED INSTRUCTIONS AND PARAMETERS FOR SUBLIMATION PRINTING
BEFORE STARTING THE SUBLIMATION PROCESS
If the tile has been stored in a cold place, moisture may have accumulated and this may affect the sublimation. In these circumstances, it is advisable to:
Prepress or preheat the tile with its printable side upwards and protective paper at 180°C for 40-60 seconds
Allow the tile to cool down before sublimation
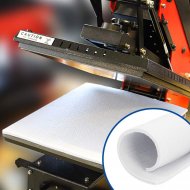
WITH A HEAT PRESS
Print in mirror image the design you want to print on the tile
Preheat the press to 180ºC
Place Nomex pad on the lower platen of the press and cover with protective paper to prevent it from getting stained. The pad will allow the heat to distribute evenly. It will also help to maximise the contact between the tile and the printed design
Place the printed design ton the tile and secure them with heat-resistant tape to prevent it from moving
Place the tile "face down" on the Nomex pad. The printable part of the tile and the paper must be facing the pad
Press for 300-310 seconds, medium-high pressure
Open the press and remove the printed tile with a protective glove
Peel off the paper carefully
WITH A 3D OVEN AND VACUUM MEMBRANE
Print in mirror image the design you want to print on the tile
Heat the 3D oven to 180ºC
Place the printed design face down on the white side of the tile and fix them with heat-resistant tape
Insert the tile on the top tray of the oven with the printed side facing up
Close the membrane and make the vacuum. Make sure no air bubbles remain on the surface
Close the oven and bake for 300-310 seconds
Open the oven and take out the sublimated tile with the help of a protective glove
https://www.brildor.com/en/sublimation-square-matte-tiles24659Sublimation Matte Tiles<p class="enlace"><a id="saber-mas"></a> </p>
<h2>More information about the Sublimation Matte Tiles</h2>
<p> </p>
<p><strong>INDEX</strong></p>
<p>> <a href="#saber-mas1">Description</a></p>
<p>> <a href="#saber-mas2">Dimensions/</a> <a href="#saber-mas2"> Print area</a></p>
<p>> <a href="#saber-mas3">Recommended instructions and parameters for sublimation printing</a></p>
<p style="padding-left: 40px;">› <a href="#saber-mas4">With a heat press</a></p>
<p style="padding-left: 40px;">› <a href="#saber-mas5">With a 3D oven and vacuum membrane </a></p>
<p> </p>
<p class="enlace"><a id="saber-mas1"></a> </p>
<p><strong>DESCRIPTION<br></strong></p>
<ul>
<li>In <strong>Related Products</strong>, you will find Nomex felt pad and adhesive heat tape, which are very useful during the sublimation process</li>
<li>It is possible to sublimate them with flat press as well as with 3D oven and membrane vacuum oven</li>
</ul>
<p> </p>
<p class="enlace"><a id="saber-mas2"></a> </p>
<p><strong>DIMENSIONS AND MAXIMUM PRINT AREA<br></strong></p>
<table>
<tbody>
<tr>
<td style="text-align: center;"><strong>Reference</strong></td>
<td style="text-align: center;"><strong>Name<br></strong></td>
<td style="text-align: center;"><strong>Dimensions (cm)<br></strong></td>
</tr>
<tr>
<td style="text-align: center;">036899</td>
<td style="text-align: center;">10x10</td>
<td style="text-align: center;"><span class="azul-negrita">10,6 x 10,6</span></td>
</tr>
<tr>
<td style="text-align: center;">036898</td>
<td style="text-align: center;">15x15<span class="azul-negrita"><br></span></td>
<td style="text-align: center;"><span class="azul-negrita">15,2 x 15,2</span></td>
</tr>
</tbody>
</table>
<p> </p>
<p class="enlace"><a id="saber-mas3"></a> </p>
<p><strong>RECOMMENDED INSTRUCTIONS AND PARAMETERS FOR SUBLIMATION PRINTING</strong></p>
<p><strong>BEFORE STARTING THE SUBLIMATION PROCESS</strong></p>
<p>If the tile has been stored in a cold place, moisture may have accumulated and this may affect the sublimation. In these circumstances, it is advisable to:</p>
<ul>
<li>Prepress or preheat the tile with its printable side upwards and protective paper at <span class="azul-negrita">180°C</span> for <span class="azul-negrita">40-60 seconds</span></li>
<li>Allow the tile to cool down before sublimation</li>
</ul>
<p class="enlace"><a id="saber-mas4"></a> </p>
<p><strong>WITH A HEAT PRESS</strong></p>
<ul>
<li>Print in mirror image the design you want to print on the tile</li>
<li>Preheat the press to <span class="azul-negrita">180ºC</span></li>
<li>Place Nomex pad on the lower platen of the press and cover with protective paper to prevent it from getting stained. The pad will allow the heat to distribute evenly. It will also help to maximise the contact between the tile and the printed design</li>
<li>Place the printed design ton the tile and secure them with heat-resistant tape to prevent it from moving</li>
<li>Place the tile "face down" on the Nomex pad. The printable part of the tile and the paper must be facing the pad</li>
<li>Press for <span class="azul-negrita">300-310 seconds</span>, medium-high pressure<span class="azul-negrita"><br></span></li>
<li>Open the press and remove the printed tile with a protective glove</li>
<li>Peel off the paper carefully</li>
</ul>
<p class="enlace"><a id="saber-mas5"></a> </p>
<p><strong>WITH A 3D OVEN AND VACUUM MEMBRANE</strong></p>
<ul>
<li>Print in mirror image the design you want to print on the tile</li>
<li>Heat the 3D oven to <span class="azul-negrita">180ºC</span></li>
<li>Place the printed design face down on the white side of the tile and fix them with heat-resistant tape</li>
<li>Insert the tile on the top tray of the oven with the printed side facing up</li>
<li>Close the membrane and make the vacuum. Make sure no air bubbles remain on the surface</li>
<li>Close the oven and bake for <span class="azul-negrita">300-310 seconds</span></li>
<li>Open the oven and take out the sublimated tile with the help of a protective glove</li>
<li>Peel off the paper carefully</li>
</ul>
<p> </p>https://www.brildor.com/media/catalog/product/a/z/azulejos-blanco-mate-cuadrados.jpg1.05instock01.05000https://www.brildor.com/media/catalog/product/a/z/azulejos-blanco-mate-cuadrados.jpg220140842292925135264854295949436/Blanks/Blanks/Tiles/Blanks/Ceramic2021-07-24T06:05:33+0000